bundler環境で動いてるunicornでgem が更新されない話
TL;DR
Unicornをpreload_app=falseで運用してる場合は、
before_exec do |server|
  ENV["BUNDLE_GEMFILE"] = File.join(project_home, "Gemfile")
end
の設定をした上で、SIGUSR2 を使いましょう。 capistrano3-unicornを利用しているなら、下記の通りです。
after 'deploy:publishing', 'deploy:restart'
namespace :deploy do
  task :restart do
    invoke 'unicorn:restart'
  end
end
発生していた問題
新しいgemをGemfileに追加してcapistranoでデプロイするも、なぜか新しいgemを認識してくれない。
## unicorn.log

E, [2016-09-08T15:02:36.583698 #5571] ERROR -- : uninitialized constant ExceptionNotifier::Rake (NameError)
/home/myapp/myapp/releases/20160908060023/config/initializers/exception_notification.rb:10:in `<top (required)>'

(以下略)
設定
preload_appはfalseで運用しているため、capistrano3-unicornのREADMEに従って、config/deploy.rbには下記の通り記述しています。
after 'deploy:publishing', 'deploy:restart'
namespace :deploy do
  task :restart do
    invoke 'unicorn:reload'
  end
end
この設定により cap production deploy を実行すると、SIGHUP をunicornに送ることになります。
Running /usr/bin/env kill -s HUP `cat /home/myapp/myapp/current/tmp/pids/unicorn.pid` on ***.***.***.***
原因
2つほど誤解(というか理解不足)がありました。
誤解その1
http://unicorn.bogomips.org/Sandbox.html に従って、before_exec で ENV["BUNDLE_GEMFILE"] をセットしていました。
before_exec do |server|
  ENV["BUNDLE_GEMFILE"] = File.join(project_home, "Gemfile")
end
が、これがうまく動作しません。
UnicornでSIGHUPをハンドリングしている箇所を読んで見ると、preload_app=false では before_exec を実行しないことが判明。。。
誤解その2
そうは言っても https://unicorn.bogomips.org/SIGNALS.html のHUPには
When reloading the application, Gem.refresh will be called so updated code for your application can pick up newly installed RubyGems.
と書かれているじゃないか、と思うわけです。
実際、unicornのコードやログを見ても、Gem.refresh を呼び出しているようにも見えます。
I, [2016-09-09T11:49:21.648309 #5967]  INFO -- : worker=0 spawned pid=5967
I, [2016-09-09T11:49:21.667362 #5967]  INFO -- : Refreshing Gem list
I, [2016-09-09T11:49:23.931829 #30636]  INFO -- : reaped #<Process::Status: pid 14112 exit 0> worker=1
I, [2016-09-09T11:49:23.933808 #5970]  INFO -- : worker=1 spawned pid=5970
I, [2016-09-09T11:49:23.934109 #5970]  INFO -- : Refreshing Gem list
が、どうも疑わしいので Bundler のコードを追いかけてみました。
    # Because Bundler has a static view of what specs are available,
    # we don't #refresh, so stub it out.
    def replace_refresh
      gem_class = (class << Gem; self; end)
      redefine_method(gem_class, :refresh) {}
    end
空っぽに置き換えられていることが判明。。。
どうすればよいか?
USR2 シグナルを使えばOKです。
Unicornのmasterプロセスは USR2 シグナルを受取ると、自身をforkして unicornコマンドをexecします。
I, [2016-09-09T16:54:40.831653 #10698] INFO -- : executing ["/home/myapp/myapp/shared/bundle/ruby/2.2.0/bin/unicorn", "-c", "/home/myapp/myapp/current/config/unicorn/sandbox.rb", "-E", "deployment", "-D", {12=>#<Kgio::TCPServer:fd 12>}] (in /home/myapp/myapp/releases/20160909075156)
コードを見ると、execの直前でbefore_execを実行しているので、
before_exec do |server|
  ENV["BUNDLE_GEMFILE"] = File.join(project_home, "Gemfile")
end
でBUNDLE_GEMFILEをセットしておけばよいです。これで新しいGemfileをexecするプロセスで認識できます(この時点でcurrent symlinkは切り替え済み)。
なお、execで実行されるunicornのbinはGem.bin_pathを呼び出すのですが、BundlerがこのコードによりGem.bin_pathを書き換えているので新しいgemを認識できるということのようです。(詳しく追ってないので、もしかしたら間違っているかも)
REST API
REST APIをつくるときのリファレンスをまとめておく場所(の予定)
W3C Status Code
HTTP/1.1: Status Code Definitions
jsonapi
Blogs
Best Practices for Designing a Pragmatic RESTful API | Vinay Sahni
クリックジャッキングとX-Frame-Options
クリックジャッキングとX-Frame-Optionsについて調べたことをまとめます。
クリックジャッキング
クリックジャッキング攻撃とは、ユーザを視覚的にだまして正常に見えるウェブページ上のコンテンツをクリックさせ、別のウェブページのコンテンツをクリックさせる攻撃のことである。その結果、ユーザが公開するつもりのないプライバシー情報を公開させられたり、意図しない情報を登録させられたりするなどの被害を受ける可能性がある。
出典: クリックジャッキング - IPA 独立行政法人 情報処理推進機構 PDF
悪意あるサイトはiframe を透明化して、攻撃対象のサイトを読み込みます。 X-Frame-Options レスポンスヘッダを設定することで、対策をすることができます。
X-Frame-Options
3種類の値を設定することができます。
DENY
サイト側の意図に関わらず、ページをフレーム内に表示することはできません。
SAMEORIGIN
自身と生成元が同じフレーム内に限り、ページを表示することができます。
ALLOW-FROM uri
指定された生成元に限り、ページをフレーム内に表示できます。
https://developer.mozilla.org/ja/docs/HTTP/X-Frame-Options
Railsでは...
SAMEORIGIN がデフォルトです。 https://github.com/rails/rails/blob/52ce6ece8c8f74064bb64e0a0b1ddd83092718e1/actionpack/lib/action_dispatch/railtie.rb#L22
Rails4.0 で導入されました。
一部機能をiframeとして外部に提供したい場合はレスポンスヘッダから削除すればokです。
response.headers.delete 'X-Frame-Options'
ES6 + React + Redux + webpack な環境構築
ES6 + React + Redux + webpack なフロントエンド環境を構築するためのメモ。
packages.json
npm install --save react react-dom react-redux
npm install --save-dev babel-loader babel-core babel-preset-es2015 babel-preset-react
npm install --save-dev webpack webpack-dev-server react-hot-loader
npm install --save-dev eslint eslint-plugin-react eslint-plugin-import
{
  "name": "my-env",
  "version": "1.0.0",
  "description": "",
  "scripts": {
    "start": "webpack-dev-server --inline"
  },
  "author": "",
  "license": "ISC",
  "dependencies": {
    "react": "^15.1.0",
    "react-dom": "^15.1.0",
    "react-redux": "^4.4.5",
    "redux": "^3.5.2"
  },
  "devDependencies": {
    "babel-core": "^6.10.4",
    "babel-loader": "^6.2.4",
    "babel-preset-es2015": "^6.9.0",
    "babel-preset-react": "^6.11.1",
    "eslint": "^2.13.1",
    "eslint-plugin-import": "^1.9.2",
    "eslint-plugin-react": "^5.2.2",
    "react-hot-loader": "^1.3.0",
    "webpack": "^1.13.1",
    "webpack-dev-server": "^1.14.1"
  }
}
.babelrc
{
  "presets": ["es2015", "react"]
}
.eslintrc
{
  "env": {
    "browser": true,
    "es6": true,
    "commonjs": true
  },
  "parserOptions": {
      "ecmaVersion": 6,
      "sourceType": "module",
      "ecmaFeatures": {
          "jsx": true
      }
  },
  "plugins": [
    "react"
  ],
  "extends": ["eslint:recommended", "plugin:react/recommended"]
}
webpack.config.js
/*eslint no-unused-vars: ["error", { "varsIgnorePattern": "webpack" }]*/
const webpack = require('webpack');

module.exports = {
  entry: './src/app.js',
  output: {
    path: './public',
    filename: 'application.js'
  },
  watch: true,
  module: {
    loaders: [{
      test: /\.js$/,
      exclude: /node_modules/,
      loaders: ["react-hot", "babel-loader"]
    }]
  },
  devServer: {
    contentBase: 'public'
  }
}
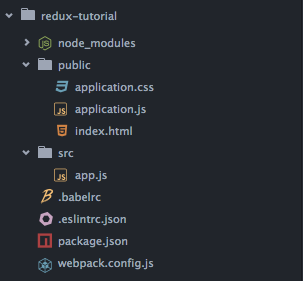
ディレクトリ

meta要素に関する仕様
そういや真面目にmeta要素の仕様を読んだことなかったので、調べてみました。
meta 要素
お馴染みこんなやつです。
<meta content="width=device-width, initial-scale=1.0, maximum-scale=1.0, user-scalable=no" name="viewport">
<meta name="csrf-param" content="authenticity_token">
4.2 Document metadata — HTML5 に定義が書かれています。適当に訳すと...
The meta element represents various kinds of metadata that cannot be expressed using the title, base, link, style, and script elements.
title, base, link, style, script 要素では表現できないメタデータを表現するための要素です。
The meta element can represent document-level metadata with the name attribute, pragma directives with the http-equiv attribute, and the file's character encoding declaration when an HTML document is serialized to string form (e.g. for transmission over the network or for disk storage) with the charset attribute.
name属性でドキュメントレベルのメタデータを、http-quiv属性でプラグマディレクティブを、charset属性で文字エンコーディング宣言を表現します。
name 属性
If a meta element has a name attribute, it sets document metadata. Document metadata is expressed in terms of name-value pairs, the name attribute on the meta element giving the name, and the content attribute on the same element giving the value.
もしmeta要素がname属性を持つならば、meta要素はドキュメントメタデータを設定します。ドキュメントメタデータは name-value として表現され、name属性は名前を、content属性は値を示します。
Standard metadata names
- application-name
- author
- description
- generator
- keywords
Other metadata names
MetaExtensions - WHATWG Wiki を見るのがよいとのこと。 twitter:site, csrf-token など様々なものが定義されています。
MacでMecabをpython3から利用する方法
2016年5月時点で最もカンタンと思われる方法。 python3 はインストール済みという前提で。
インストール
brew install mecab
brew install mecab-ipadic

pip install mecab-python3
>>> import MeCab
>>> m = MeCab.Tagger("-Ochasen")
>>> print(m.parse("すもももももももものうち"))
すもも  スモモ  すもも  名詞-一般
も      モ      も      助詞-係助詞
もも    モモ    もも    名詞-一般
も      モ      も      助詞-係助詞
もも    モモ    もも    名詞-一般
の      ノ      の      助詞-連体化
うち    ウチ    うち    名詞-非自立-副詞可能
EOS
natto
名詞、形容詞、形容動詞だけ抜き出す。 natto を使うと便利。
from natto import MeCab

def tokenize(text):
    tokens = []
    with MeCab('-F%f[0],%f[6]') as nm:
        for n in nm.parse(text, as_nodes=True):
            # ignore any end-of-sentence nodes
            if not n.is_eos() and n.is_nor():
                klass, word = n.feature.split(',', 1)
                if klass in ['名詞', '形容詞', '形容動詞']:
                    tokens.append(word)
    return tokens

print(tokenize('私の名前は太郎です。'))
# ['私', '名前', '太郎']
ファイルの拡張子を一括置換する
例えば
application.css.scss -> application.scss
という一括置換をしたい場合には
find . -type f -print0 | perl -pe 's/\.css\.scss//g' | xargs -0 -I% git mv %.css.scss %.scss
とすれば ok。
参照: